

Table of Contents
- Why Hang a Gallery Wall Without Nails
- Choosing the Right Picture Hanging Strips for Frames
- Preparing Your Wall Surface Before Hanging
- How to Hang Art on Textured Walls
- Creating a Gallery Wall Layout Template
- Step-by-Step: Applying Adhesive and Hanging Your Frames
- How to Remove Picture Hanging Strips Without Damage
- Common Mistakes to Avoid When Hanging Without Nails
- Frequently Asked Questions
Last Updated: October 12, 2026
Why Hang a Gallery Wall Without Nails
Learning how to hang a gallery wall without nails opens up possibilities that traditional methods can't match. Renters, homeowners worried about wall damage, and anyone who likes to refresh their space frequently find that how to hang a gallery wall without nails becomes the smarter choice. Countless people transform blank walls with confidence using adhesive solutions, no landlord concerns, no patching compound, no permanent commitment.
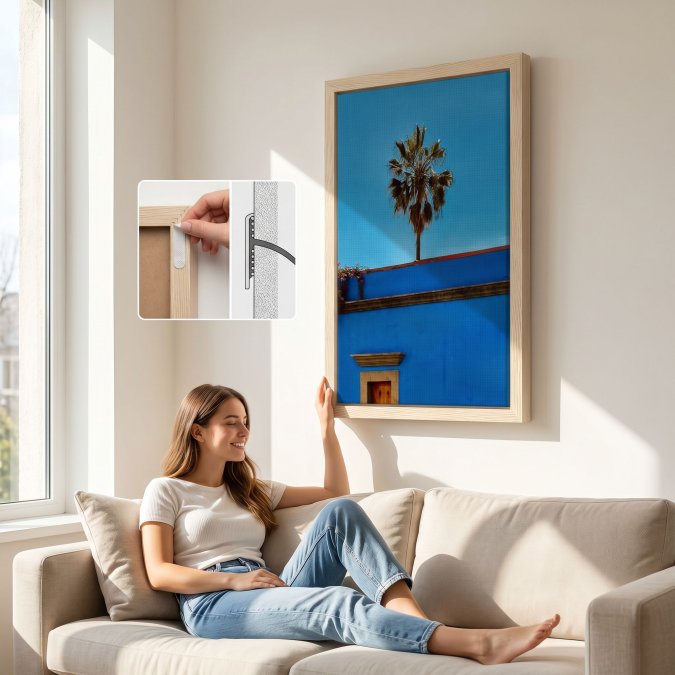
The beauty of nail-free hanging is flexibility. You can rearrange your wall art whenever the mood strikes. Adhesive strips and hooks work on most surfaces, from smooth drywall to textured walls, making them adaptable to nearly any room in your home. Whether you're displaying travel photography from CaliCuration or a mix of framed prints, the right technique keeps your art secure while protecting your walls.
This approach works especially well for renters, temporary displays, and gallery walls in shared spaces. It's also ideal if you're still deciding on the perfect layout, you can test arrangements before committing to nail holes.
Choosing the Right Picture Hanging Strips for Frames
The foundation of any nail-free gallery wall starts with selecting the right adhesive strips. Not all strips perform equally, and frame weight matters more than most people realize.
Understanding Weight Limits and Frame Types
Picture hanging strips come with weight ratings, and matching your frame to the right strip is essential. Lightweight frames under 5 pounds work well with standard adhesive strips, while heavier frames require heavy-duty options. We recommend checking your frame's actual weight before purchasing strips.
The frame material also affects your choice. Wood frames, metal frames, and canvas-wrapped prints all hang differently. Wood frames distribute weight evenly across the back, making them ideal for adhesive strips. Metal frames and lightweight canvases also work well. However, very heavy framed artwork, think large oil paintings or oversized gallery-quality pieces, may exceed what adhesive strips can safely hold, even with heavy-duty versions.
When selecting strips, look for options specifically labeled for picture hanging. Standard command strips work in a pinch, but picture-hanging strips are engineered for this exact purpose. They grip differently and hold more reliably over time.
Adhesive Hooks and Alternative Hardware
Beyond strips, adhesive hooks offer another layer of flexibility. These hooks attach to your wall using the same adhesive technology but give you more control over spacing and alignment. Some people use hooks as an alternative; others combine hooks with strips for added security on heavier pieces.
Adhesive hooks come in various sizes and weight ratings. Small hooks suit lightweight prints and photographs, while larger hooks handle heavier framed pieces. Combining a strip on the frame's back with a hook on the wall creates a dual-anchor system that feels more secure, especially for valuable or sentimental art.
The advantage of hooks is repositioning. If you change your mind about placement, you can remove the hook and reapply it elsewhere without damaging the wall.
Preparing Your Wall Surface Before Hanging
Your wall's condition determines how well adhesive strips will hold. A clean, properly prepared surface makes the difference between art that stays put and art that slides down the wall weeks later.
Start by cleaning the area where you'll hang your frames. Use a dry cloth to remove dust, then wipe with a slightly damp cloth to eliminate any residue. For walls that have been painted recently, wait at least two weeks before applying adhesive strips, new paint needs time to cure fully.
Smooth drywall accepts adhesive strips most readily. If your wall feels rough or has visible imperfections, sand those areas gently with fine-grit sandpaper before hanging. This creates a smoother surface for the adhesive to grip.
Temperature and humidity matter too. Adhesive strips perform best in moderate conditions, between 50°F and 85°F with moderate humidity. Extremely cold or hot rooms, or very humid spaces like bathrooms, can reduce adhesion. If you're hanging in a bathroom or high-humidity area, choose strips specifically rated for moisture.
How to Hang Art on Textured Walls
Textured walls present a common challenge. Popcorn ceilings, stucco, and rough-textured finishes don't provide the smooth surface adhesive strips prefer, but solutions exist.
The key is finding the high points of the texture and pressing strips firmly against those raised areas. Use your hand to feel the wall and identify where the texture peaks. Apply pressure for a full minute, longer than you'd use on smooth walls, to ensure the strip makes contact with enough surface area.
For heavily textured walls, consider using larger adhesive strips or multiple smaller strips per frame. This distributes the frame's weight across more contact points. Some people apply a thin layer of joint compound or wall primer to small sections of textured walls to create a smoother surface, but this requires letting the compound dry fully before hanging.
Picture ledges and floating shelves offer an excellent alternative for textured walls. These ledges mount securely and let you lean or rest frames against them rather than relying on adhesive contact. They work beautifully for rotating displays and give you a flexible gallery wall without wrestling with texture.
Creating a Gallery Wall Layout Template
Before applying a single strip, plan your layout. This step prevents mistakes and saves you from rearranging multiple times.
Measuring and Spacing Your Frames
Measure your wall space and note the dimensions. Most gallery walls work best with 2-3 inches between frames, though this varies based on personal preference. Closer spacing creates a cohesive, modern look; wider spacing feels more open and airy.
Calculate the total width and height of your arrangement. If you're hanging five frames in a row, add their widths plus the spacing between them. This tells you whether your arrangement fits your wall. For a clustered gallery wall, sketch the rough arrangement on paper first, noting frame sizes and positions.
Consider the eye level rule: the center of your gallery wall should sit at approximately 57-60 inches from the floor, roughly eye level when standing. This creates a balanced, visually pleasing display that feels intentional rather than random.
Using Painter's Tape to Plan Your Arrangement
Painter's tape transforms your wall into a planning canvas. Use it to outline where each frame will hang before applying any adhesive. This lets you see the full arrangement and adjust spacing, alignment, and positioning without commitment.
Measure carefully and apply painter's tape in the shape of each frame. Step back frequently and view your arrangement from different distances. Does the spacing feel right? Are the frames aligned the way you envisioned? This is the time to make changes, tape is forgiving.
Once you're satisfied with the layout, mark the top center of each frame outline with a small piece of tape or a pencil dot. These marks guide your strip placement. Remove the painter's tape carefully; it should peel away cleanly without damaging fresh paint.
| Element | Spacing | Alignment | Height Guide |
|---|---|---|---|
| Between frames | 2-3 inches | Consistent | Eye level: 57-60" from floor |
| From wall edge | 6-12 inches | Centered or flush | Depends on wall size |
| Vertical rows | Even intervals | Straight lines | Use level tool |
| Horizontal rows | Even intervals | Straight lines | Use level tool |
Step-by-Step: Applying Adhesive and Hanging Your Frames
Now comes the actual hanging. This process is straightforward when you follow the right sequence.
Step 1: Prepare your strips. Remove the adhesive strips from their packaging. Most strips have two sides, one that sticks to the frame, one that sticks to the wall.
Step 2: Position your frame. Hold the frame at your marked location on the wall.
Step 3: Apply wall-side strips. Peel the backing from the wall-side strips on your frame and press the frame firmly against the wall.
Step 4: Step back and check. After pressing, wait the full time recommended by the strip manufacturer before letting go. This is usually 24 hours for maximum hold.
Step 5: Repeat for each frame. Continue this process for each frame in your gallery wall. Work methodically, checking alignment frequently. Use your painter's tape marks or pencil dots as guides.
Step 6: Final inspection. Once all frames are hung and the adhesive has fully set, inspect each one. Gently test each frame to ensure it's secure.
How to Remove Picture Hanging Strips Without Damage
One of the best parts of adhesive strips is that they come off cleanly when you need to change your display. Removal is simple if you follow the right technique.
Start by gently lifting one corner of the frame. Don't yank or pull hard; adhesive strips are designed to release gradually. Slowly peel the frame away from the wall, working around all edges.
Once the frame is off, you'll see strips remaining on the wall. These come off separately. Roll the strips gently with your fingers, starting at one corner and rolling toward the center. The adhesive will ball up and peel away, leaving no residue.
If strips leave any residue behind, a bit of rubbing alcohol on a cloth removes it completely. The wall stays unmarked and ready for new strips or simply bare.
For frames that have been hanging for months or years, the adhesive may have hardened. In this case, apply a bit of heat with a hair dryer to soften the adhesive before peeling. This makes removal easier and gentler on your walls.
Common Mistakes to Avoid When Hanging Without Nails
Learning from others' experiences saves you frustration. These mistakes happen frequently, but they're all preventable.
Skipping wall prep. Dust and residue reduce adhesion dramatically. Frames can fall within days if the wall isn't cleaned first.
Underestimating frame weight. People often overload strips with frames heavier than rated. Check actual frame weight, not estimated weight.
Not pressing long enough. This is the number-one reason frames slip. Press for the full recommended time. Set a timer if you tend to rush.
Hanging immediately after application. Adhesive strips need time to set. Hanging a frame and then immediately testing its grip can cause failure.
Ignoring humidity and temperature. Adhesive strips perform poorly in extreme conditions.
Misaligning frames. A level is your friend. Crooked frames stand out and ruin the gallery wall's visual impact. Spend the extra minute checking alignment for each frame.
Using the wrong strips for the surface. Textured walls, wallpaper, and glossy painted surfaces all need different approaches. Standard strips might not hold on these surfaces.
Creating a gallery wall without nails transforms how you display art at home.
Frequently Asked Questions
How much weight can picture-hanging strips hold?
Weight capacity depends on the strip type and brand. Standard adhesive strips typically support 3-5 pounds per pair, while heavy-duty options can hold up to 16 pounds. Always check the manufacturer's specifications and match the strip strength to your frame weight. For a gallery wall without nails, we recommend using strips rated for slightly more than your heaviest frame to ensure safety and longevity.
Can you hang framed art with adhesive strips on textured walls?
Yes, but textured walls require extra preparation. Clean the surface thoroughly with isopropyl alcohol to remove dust and debris that prevents adhesion. Consider using heavy-duty adhesive strips or adhesive hooks designed for textured surfaces. For heavily textured walls, you may need to apply strips to the frame and press it firmly for 30 seconds or longer. Test with a lighter frame first to ensure the strips hold properly.
How do you arrange a gallery wall before hanging it?
Use painter's tape and paper templates to plan your layout on the wall first. Measure the center point of your wall, then work outward with tape marking frame positions. Alternatively, lay all frames on the floor to visualize spacing before hanging. Aim for 2-3 inches between frames for a cohesive look. Once satisfied with the arrangement, use the tape marks as guides when applying adhesive strips.
How do you remove adhesive picture strips without damaging paint?
Remove strips slowly and at a low angle, pulling downward rather than outward from the wall. Work gradually to avoid sudden jerks that can peel paint. If strips are stubborn, apply gentle heat with a hair dryer for 10-15 seconds to soften the adhesive. For any remaining residue, use a rubber eraser or adhesive remover designed for walls. Always test on an inconspicuous area first to ensure your paint won't be damaged.