

You found the perfect piece. It captures something real: the glow of a coastal sunset, the quiet geometry of a city at dusk. Now you want it on your wall. But the thought of drilling holes, cracking plaster, or losing your security deposit stops you cold. The good news is that you can hang art without damaging walls and still achieve a display that feels intentional and personal. This guide walks you through every method, from lightweight adhesive strips to professional rail systems, so you can put your art exactly where it belongs.
Table of Contents
Key takeaways
| Point | Details |
|---|---|
| Match method to weight | Choose your hanging solution based on your artwork’s weight to avoid falls and wall damage. |
| Prep your wall surface | Clean walls with rubbing alcohol before applying adhesives to get a reliable, lasting bond. |
| Use rails for flexibility | Picture hanging rail systems let you rearrange art freely after a single, minimal installation. |
| Avoid overloading adhesives | Exceeding a product’s weight limit is the single most common cause of art crashes and wall damage. |
| Protect art long-term | Keep pieces away from direct sunlight and check hangers periodically to preserve both art and walls. |
What to know before hanging art safely
Before you reach for any hook or strip, a few minutes of preparation will save you from frustration later. The single biggest variable is your wall type, and not every solution works on every surface.
Know your wall type
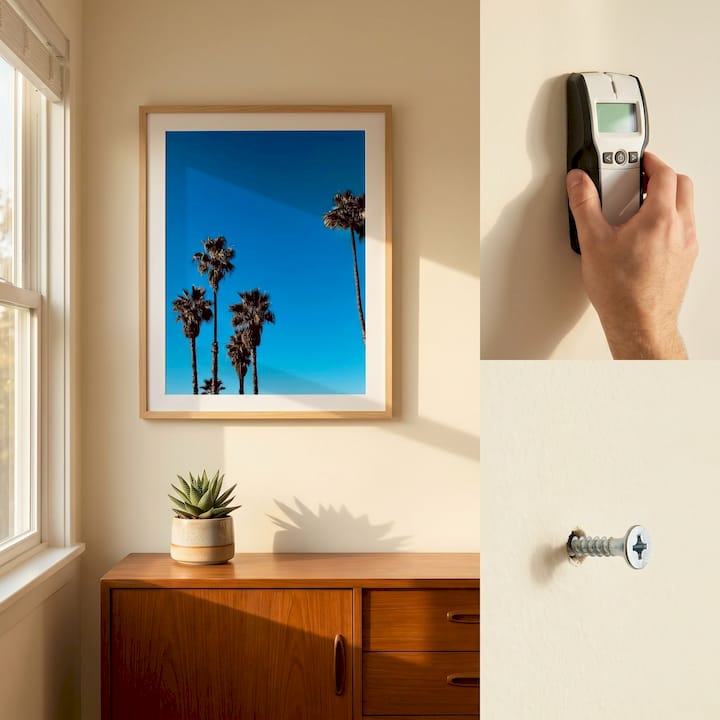
Drywall is the most forgiving surface for damage-free art hanging. Adhesive strips bond well to it, and small holes patch easily. Plaster walls, common in older homes, are denser and more brittle. Adhesives can still work, but you need to press firmly and allow full cure time. Brick and concrete require masonry anchors for anything heavy, though adhesive hooks work fine for lighter pieces. Tile is tricky because grout lines interrupt the adhesive surface. Stick to the tile face itself and keep loads light.
Categorize your artwork by weight
Think of artwork in three tiers:
-
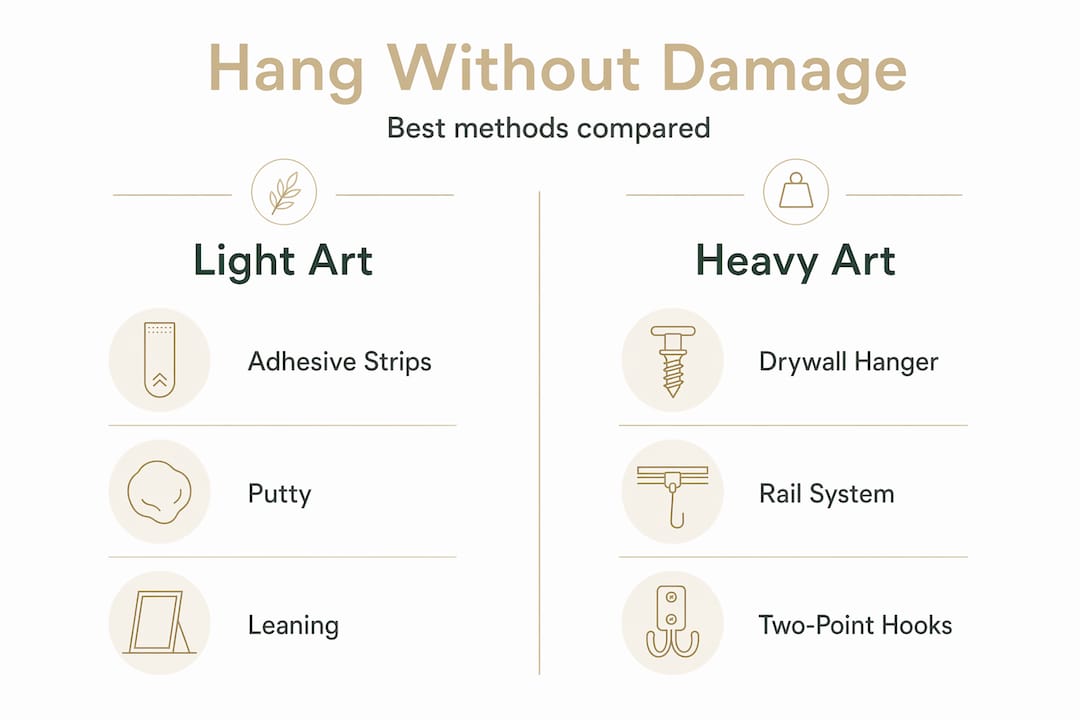
Light: Under 5 lbs. Think small framed prints, canvas panels, or paper-based pieces. Adhesive putty and standard Command strips handle these easily.
-
Medium: 5 to 20 lbs. Larger framed prints or small canvases. Command XL strips hold up to 20 lbs without tools and remove cleanly without residue.
-
Heavy: Over 20 lbs. Large canvases, framed mirrors, or gallery-style pieces. These need specialized hardware.
Surface preparation matters more than you think
Cleaning your wall with rubbing alcohol or soapy water before applying any adhesive strip dramatically improves bond strength and lowers the chance of failure. Dust, oils, and paint residue all weaken adhesion. Wipe the spot, let it dry completely, then apply.
Pro Tip: Press adhesive strips firmly against the wall for 30 seconds, then wait at least one hour before hanging anything. For best results, wait a full 24 hours before adding weight.
Hanging light to medium art: step-by-step methods
For most everyday art display, adhesive solutions are the cleanest and most wall-friendly hanging solutions available. Here is how to use them well.
-
Choose the right strip or hook. Match the product to your artwork’s weight. For pieces under 5 lbs, standard adhesive hooks or putty work well. For pieces between 5 and 20 lbs, use Command XL Picture Hanging Strips, which are specifically rated for that range.
-
Clean the wall and the frame. Wipe both surfaces with rubbing alcohol. Let them dry for at least 5 minutes before touching them again.
-
Attach strips to the frame first. Press the strips onto the back of the frame, following the manufacturer’s layout. For larger frames, use one pair of strips per corner.
-
Mark your placement. Hold the frame against the wall at your desired height. A good rule of thumb: art looks best when hung at 57 inches from the floor to the center of the piece. That is roughly eye level for most people.
-
Press and hold. Once you have your placement marked, press the frame firmly against the wall for 30 seconds. Apply even pressure across all strips.
-
Wait before letting go. For medium-weight pieces, give the adhesive a full hour to cure before releasing the frame completely.
Adhesive putty and leaning art
Adhesive putty works beautifully for very light pieces like small prints or paper art. It leaves almost no trace on walls and repositions easily. For a completely nail-free approach, consider leaning larger canvases against a wall on a shelf, mantel, or console table. This is one of the most popular art display methods in modern interiors because it feels relaxed and collected, and it lets you swap pieces out without touching the wall at all.
Pro Tip: When using adhesive putty, roll it into a small ball, press it flat, and apply it to all four corners of the frame back. This distributes the weight evenly and prevents the piece from tilting.
Hanging heavier artwork with minimal wall impact
When your piece weighs more than 20 lbs, you need solutions with more holding power. The good news is that several options cause only minimal, easily repairable wall impact.
3M CLAW drywall hangers
The 3M CLAW drywall hanger supports up to 45 lbs without studs or traditional anchors. It uses a small, claw-like prong that pierces drywall at an angle, creating a secure hold with a hole that is barely larger than a thumbtack mark. If you ever remove it, the hole patches in minutes with a dab of spackle. For renters who want to hang a statement piece, this is one of the smartest tools available.
Picture hanging rail systems
Picture rails are the professional standard for damage-free art hanging in galleries and homes alike. You install a single rail along the top of your wall (with a few small screws or, in some systems, adhesive), and then hang as many pieces as you like from it using adjustable hooks and cables. Rail systems like the Artiteq Contour Rail allow you to rearrange your entire display without touching the wall again. Some systems can even be glued in place when drilling is not allowed.
Here is a quick comparison of the main options for heavier pieces:
| Method | Weight capacity | Wall impact | Best for |
|---|---|---|---|
| 3M CLAW hanger | Up to 45 lbs | Tiny patchable hole | Single heavy frames |
| Picture hanging rail | Varies by system | Minimal screw holes | Multiple pieces, flexible display |
| French cleat | 50 lbs or more | Two screw holes | Large canvases, shelves |
| Two-point wall hooks | 20 to 40 lbs | Two small nail holes | Stable, level hanging |
Two-point hooks for stability
Gallerist Luke Duncan recommends hanging heavy art directly on two hooks or screws rather than a single wire. A single wire allows the frame to shift and tilt over time. Two fixed points keep everything level and secure. This is a small adjustment with a noticeable difference in long-term stability.
Pro Tip: Before installing any hardware for heavier pieces, use a stud finder app on your phone. Anchoring into a stud rather than just drywall gives you significantly more holding strength with the same small hole.
Common mistakes that lead to wall damage
Even with the right materials, a few missteps can turn a careful hanging project into a wall repair job. Here are the ones worth avoiding.
-
Overloading adhesive strips. Exceeding the weight limit on any adhesive product degrades its reliability and often leads to the piece falling at the worst possible time. Always check the packaging and stay under the rated limit.
-
Ignoring wall type. Adhesive strips that work perfectly on smooth drywall may fail completely on textured or porous surfaces. Test a small strip in an inconspicuous spot first.
-
Skipping surface prep. Applying strips to a dusty or oily wall is the fastest way to watch your art slide down at 2 a.m. Clean the surface every time, without exception.
-
Hanging on a single wire. As noted above, single wire hanging causes shifting and uneven weight distribution. Use two points whenever possible.
-
Removing adhesive strips too quickly. Pull the tab slowly, straight down along the wall, not outward. Pulling outward tears the surface. Slow and steady is what keeps your paint intact.
Patience is the most underrated tool in damage-free art hanging. Rushing the cure time, the removal, or the placement is where most wall damage actually happens.
Checking stability and keeping your display looking great
Once your art is up, a few simple habits will keep everything secure and looking its best for years.
Pro Tip: After hanging any piece, give it a gentle nudge from the side and from below. If it shifts more than a few millimeters, the hanging method needs adjustment before you walk away.
Here is a short maintenance checklist to revisit every few months:
-
Check adhesive strips for peeling edges. If a strip corner is lifting, press it back firmly or replace it before the whole strip fails.
-
Inspect hooks and cables for wear. Wire can fray and hooks can loosen over time, especially on heavier pieces.
-
Dust frames gently. Use a soft, dry cloth. Moisture from cleaning sprays can seep into frames and damage both the art and the wall surface behind it.
-
Protect from direct sunlight. Direct sunlight causes irreversible fading over time. Rotate pieces or use UV-filtering glass if your space gets strong afternoon light.
-
Watch for humidity. Bathrooms and kitchens are hard on both art and adhesives. Use moisture-resistant framing materials in those spaces and check adhesives more frequently.
Updating your display is just as easy. With adhesive strips, you simply remove the piece, follow the slow-pull removal method, clean the wall, and reposition. With a rail system, you slide hooks along the track without touching the wall at all.
My honest take on art hanging and why the method matters
I have hung a lot of art in a lot of spaces, from small apartments with landlords who counted every nail hole to wide-open living rooms with fresh plaster walls. What I have learned is that the method you choose shapes not just your wall, but your relationship with the art itself.
When you use a rail system or adhesive strips, you give yourself permission to change your mind. You can swap a coastal print for a desert landscape when the seasons shift your mood. You can try a new arrangement without committing to it permanently. That flexibility is not just practical. It changes how you engage with the pieces you own.
What I have also seen is that people tend to underestimate their walls and overestimate adhesives. A beautiful piece of travel photography deserves a secure, thoughtful mount. Throwing a strip on the back and hoping for the best is not the same as preparing the surface, choosing the right product, and giving it time to cure. The difference between those two approaches is the difference between art that stays and art that falls.
Curator Kimberly Drew has said that protecting art from sunlight is as vital as the hanging method itself. I agree completely. The way you hang a piece and where you place it are both acts of care. Your walls are the backdrop of your daily life. Treat them, and the art on them, with the same intention you brought to choosing the piece in the first place.
— Info
Art worth putting on your walls
Once you have your hanging method sorted, the next question is what to put up. Calicuration creates wall art from original, founder-shot travel photography, each piece capturing a specific moment: the golden hour along the Central Coast, the quiet geometry of city light, the warmth of a desert afternoon. Every print is custom-produced on demand, so what arrives is made for your space.

Calicuration’s pieces are sized and finished to work beautifully with adhesive strips, picture rails, and the other wall-friendly hanging solutions covered in this guide. Whether you are refreshing a single wall or building out a full gallery display, the California wall art collection offers something for every room and every mood. If you are drawn to something quieter and more architectural, the Architectural Light Study canvas pairs especially well with modern interiors and minimal hanging hardware. Every order also contributes 5% to community impact efforts in Los Angeles and New York City.
FAQ
What is the best way to hang art without nails?
Command strips and adhesive hooks are the most reliable nail-free options for light to medium artwork. For heavier pieces, picture hanging rail systems offer a strong, flexible alternative with minimal wall impact.
How much weight can Command strips hold?
Command XL Picture Hanging Strips hold up to 20 lbs without tools and remove cleanly without leaving residue or damaging walls. Always check the specific product rating before hanging.
Can you hang heavy art without drilling?
Yes, with the right tools. The 3M CLAW drywall hanger supports up to 45 lbs using a small prong that leaves only a tiny, patchable hole. Picture rail systems can also be glued in place where drilling is not permitted.
How do you remove adhesive strips without damaging paint?
Pull the tab slowly and straight down along the wall surface, not outward at an angle. Pulling outward is what tears paint. Going slow and keeping the pull parallel to the wall protects the surface underneath.
Where should art be hung on a wall?
The center of a piece should sit at approximately 57 inches from the floor, which aligns with average eye level and is the standard used in most galleries. This placement makes art feel grounded and intentional rather than floating too high or sitting too low.